By Craig Lloyd • Difficulty: Moderate
Follow this guide to replace an old and degraded battery in the Nintendo Switch game console.
The Nintendo Switch uses JIS screws, which are slightly different than Phillips. We don’t recommend using Phillips drivers for JIS screws; however, iFixit Phillips bits are specifically designed to be compatible with JIS screws. If you use a non-iFixit Phillips driver, you risk stripping the screws.
When you remove the shield plate, you’ll need to replace the thermal compound between the plate and the heatsink. Normal thermal paste isn't designed to bridge large gaps, so you'll need thermal putty or viscous thermal paste.
This guide, and the part we sell, are compatible with the original Nintendo Switch model released in 2017, as well as the newer refreshed model released in 2019 (model numbers HAC-001 and HAC-001(-01), respectively).
For your safety, discharge the battery below 25% before disassembling your Switch. This reduces the risk of a fire hazard if the battery is accidentally damaged during the repair. If your battery is swollen, take appropriate precautions.


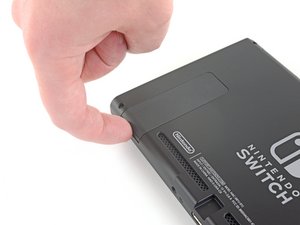
- Press and hold down the small round button on the back of the Joy Con controller.
- While you hold down the button, slide the controller upward.


- Continue sliding the Joy Con upward until it's completely removed from the console.
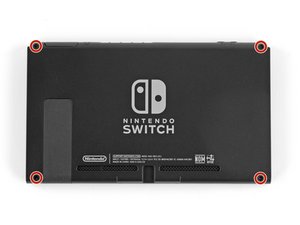
- Use a Y00 screwdriver to remove the four 6.3 mm-long screws securing the rear panel.


- Use a JIS 00 driver to remove the following screws securing the rear panel:
- One 2.5 mm-long screw on the top edge of the device
- Two 2.5 mm-long screws on the bottom edge of the device


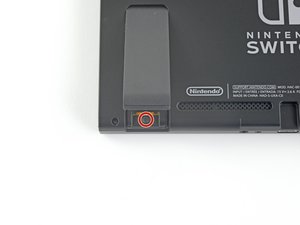
- Use a JIS 00 driver to remove the two 3.8 mm center screws on the sides of the device (one on each side).

- Use your finger to flip up the kickstand on the back of the device.
- If there's a microSD card in the microSD card slot, remove it now before you continue to the next step.
- Use a JIS 00 driver to remove the 1.6 mm screw in the kickstand well.
- Close the kickstand.


- Open the game card cartridge flap.
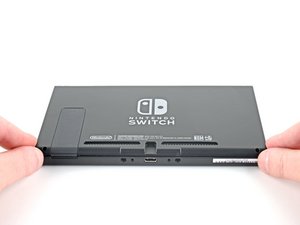
- Lift the rear panel straight up from the bottom of the device and remove it.

- Use a JIS 00 driver to remove the 3.1 mm screw securing the microSD card reader to the device.


- Use your fingers or a pair of tweezers to lift the microSD card reader straight up from the device to disconnect and remove it.
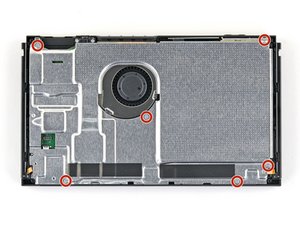
- Use a JIS 00 driver to remove the six 3 mm screws securing the shield plate to the device.


- Use your fingers or a pair of tweezers to peel back the piece of foam on the top edge of the device near the fan exhaust port.


- Insert a spudger underneath the shield plate along the edge of the device.
- Pry up to lift the shield plate and remove it from the device.
- During reassembly, if you don't have replacement thermal compound, use the flat end of a spudger to distribute the old compound evenly across the heat pipe, as thick as possible to ensure proper contact. Repeat this process on the shield plate.
- If you need to replace it, refer to our thermal paste guide to remove the old thermal compound and replace it with an appropriate compound, such as thermal putty or K5 Pro, during reassembly.


- Use the point of a spudger to pry the battery connector straight up and out of its socket on the motherboard.


- Apply a few drops of adhesive remover or high-concentration (90% or higher) isopropyl alcohol inside the battery well along the top edge to weaken the adhesive.


- Tilt the top edge of the device upward to allow the isopropyl alcohol to work its way underneath the battery.
- Hold for 1-2 minutes to allow time for the isopropyl alcohol to weaken the adhesive.


- Insert an opening pick into the gap between the battery and the wall of the battery well.
- Carefully dig the tip of the opening pick underneath the battery and slide it along the edge to begin slicing the adhesive.

- Leave the opening pick in place and apply a few more drops of adhesive remover or isopropyl alcohol inside the battery well.
- Tilt the top edge of the device upward and wait 1-2 minutes for the isopropyl alcohol to weaken the adhesive.

- Continue sliding the opening pick deeper along the top edge of the battery, slicing more of the adhesive underneath.


- Once there's enough room, insert a plastic card underneath the battery and slowly pry the battery up.
- Remove the battery.

- Use adhesive remover or isopropyl alcohol and a microfiber cloth to clean up any remaining adhesive left behind in the battery well before you install the new battery.
To reassemble your device, follow these instructions in reverse order.
For optimal performance, calibrate your newly installed battery after completing this guide.
Take your e-waste to an R2 or e-Stewards certified recycler.
Repair didn’t go as planned? Try some basic troubleshooting, or ask our Nintendo Switch Answers community for help.