By Taylor Dixon • Difficulty: Moderate
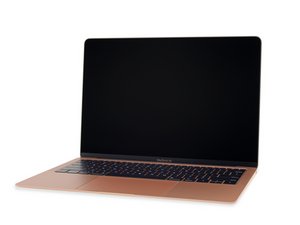
After years of neglect, Apple has finally updated the widely-beloved MacBook Air. Does this new lightweight have what it takes to keep up with ultraportables of 2018? Or is it just full of hot air? Let’s open it up and find out.
Follow us on Facebook, Instagram, and Twitter to keep up with all the latest teardowns. Subscribe to our newsletter to have teardowns delivered right to your inbox.

- Let's clear the Air about some of these specs:
- 13.3" LED-backlit IPS Retina display; 2560 x 1600 resolution (227 ppi)
- 1.6 GHz dual-core Intel Core i5 (Turbo Boost up to 3.6 GHz) with integrated Intel UHD Graphics 617
- Apple T2 custom security chip / coprocessor
- 8 GB of 2133 MHz LPDDR3 SDRAM
- 128 GB PCIe-based SSD
- 802.11ac Wi-Fi and Bluetooth 4.2
- Two Thunderbolt 3 (USB-C) ports supporting charging, DisplayPort, Thunderbolt, and USB 3.1 Gen 2


- Before venturing inside, we take a quick survey of some of the the new Air's external features.
- On its underbelly we find some fine print, and some color-matched pentalobe screws.
- Opening it up, we're greeted with a familiar 3rd-gen butterfly keyboard, and we immediately have MacBook Pro flashbacks.
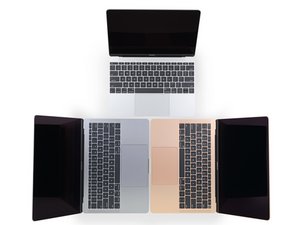
- The Air bears a remarkable resemblance to the Touch Bar-less 13" MacBook Pro—apart from thickness and Touch ID, they are nigh indistinguishable.
- ...and despite the "Air" nomenclature, this makes the 12" MacBook look like a lightweight by comparison.


- Of course, no external survey would be complete without a little X-ray reconnaissance.
- With the help of our friends at Creative Electron, we get a peek at what's to come.


- One last detour before we head inside: we can't resist popping off our favorite command key for a peek at the
noise dampeningingress-resisting membrane. - Love it or hate it, it looks like butterfly is here to stay.
- After a few twists of our pentalobe driver, one good tug pops the lower case free of its two clips, and we're in.
- Inside, we spy: a small logic board, one lonely fan, a pair of large elongated speakers, and an interesting radiator-esque heat sink.


- Just six Torx screws and a few cable connectors stand between us and logic board removal—not bad! Certainly nothing our Marlin Screwdriver Set can't handle.
- Out it comes! The Air's logic board is not mustachioed like the Pro's, nor is it quite so minuscule as the MacBook's.
- Next we snag the daughterboard, which hosts a (highly endangered) headphone jack and some connectors for the speaker and Touch ID sensor.
- Also residing on this board: a Cirrus Logic CS42L83A audio codec.


- This board may be small, but it's still packing some decent processing power:
- Intel SREKQ Core i5-8210Y processor
- Apple APL1027 339S00535 T2 coprocessor
- SanDisk SDSGFBF12 043G flash storage +1 on the back (43 GB each/128 GB total)
- Intel JHL7540 Thunderbolt 3 controller
- 338S00267-A0 (likely an Apple PMIC)
- Macronix W25Q80DVUXIE 8 Mb serial NOR flash memory
- Vishay SIC532 and Texas Instruments CSD58873Q3D power stages


- We flip the board to find even more silicon:
- 2x SK Hynix H9CCNNNCPTALBR-NUD LPDDR3 RAM (8 GB total)
- Apple/Murata 339S00446 (likely a Wi-Fi module)
- Intersil ISL95828AHRTZ PWM controller
- NXP Semiconductor PN80V secure NFC module
- Macronix MX25U3235F serial multi I/O flash memory
- Texas Instruments CD3215C00 USB type-C power controller
- Texas Instruments TPS51980A synchronous buck converter


- IC Identification, pt. 2:
- Diodes Incorporated PI3USB32 480 Mbps USB 2.0 SPST analog switch
- Renesas (formerly Intersil) ISL9240 battery charger
- Texas Instruments TAS5770 audio amplifier
- Texas Instruments TPS51916 memory power controller
- Texas Instruments TPS62130B 3 A step down converter
- Texas Instruments TMP461 remote/local temperature sensor
- Serial Memory (likely)


- Opposite the headphone jack, we spy some super modular Thunderbolt ports!
- This MacBook is off to a good start as far as we're concerned—all the ports sit on their own boards and are easily replaceable.
- Finally we meet the part responsible for blowing the air in this ... Air.
- The fan's flex cable is likely home to a Texas Instruments fan controller.

- Continuing the repair-friendly (or at least friendlier) trend, we find stretchy adhesive pull tabs under these elongated speakers!
- We don't love adhesive—reusable screws are nearly always better—but hey, pulling out this iPhone-esque stretch-release stuff is loads better than gooey solvents and blind prying.
- Plus, the mere presence of stretch-release adhesive generally means that someone at least thought about possible repair and disassembly situations.


- Moving on, we direct our attention to the trackpad.
- Unlike the newer MacBooks Pro, which have first-step replaceable trackpads, this trackpad shares a cable with the keyboard, which is pinned under the logic board.
- As the trackpad comes out, we can't help but think of a certain TIE fighter...
- The trackpad contains a Broadcom BCM5976C1 touch controller, a STMicroelectronics STM32F103B6 32-bit ARM Cortex-M3 microcontroller, a Macronix MX25L2006EZUI-12G 2 Mb serial flash memory, a Monolithic Power Systems MP6519 H-bridge current regulator, and a Maxim Integrated MAX11390A 10-bit analog to digital converter (likely).
- A Texas Instruments TMP421 remote/local temperature sensor and a Bosch Sensortec BMA282 accelerometer are the only two sensors found on the frontside of the PCB.


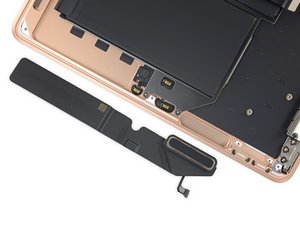
- Thanks to our friends at MacRumors, we had a hunch that removing this battery might be less nightmarish than in some Retinas we know.
- Sure enough, we find four screws and six friendly pull-to-remove adhesive strips securing this
AirPowerAir's power pack. - A sturdy frame, vaguely like those in Airs of old, supports the gaggle of battery cells and makes removal a snap.
- Here it is: the 49.9 Wh power plant. In case you're keeping track, that's slightly smaller than Dell's new XPS 13 (52 Wh), but larger than Microsoft's Surface Laptop 2 (45.2 Wh) and HP's upcoming Spectre x360 (43.7 Wh).
- Two Toshiba TPCA8087 N-channel MOSFETs are found on the battery pack PCB.


- Things are starting to look Air-y inside this golden chassis—we can almost see the finish line!
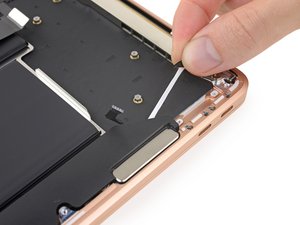
- Still lingering above the battery cavern are the metal antenna bracket and the new (modular!) Touch ID sensor, each secured by Torx screws.
- FYI, the Touch ID sensor can come out directly after the smaller audio board is removed—we just chose to let it linger.
- A few more Torx screws later, the display is free! This new Retina panel is almost the same as the one found on the MacBook Pro line, differing mainly in peak brightness (a mere 300 nits vs. the Pro's 500) and P3 color gamut support.

- We'll just let this MacBook Air out a little so you can admire its particles!
- Featuring modular ports and pull-to-release adhesive, the new MacBook Air stands out against a trend of declining repairability in Apple's laptops.
- Unfortunately, you'll still have to work around pentalobes, and neither storage nor RAM is upgradable. Though this update seems to favor experienced technicians more than the average DIYer, we're hoping it's the first step back toward repairable MacBooks.

- The MacBook Air with Retina Display 2018 earns a 3 out of 10 on our repairability scale (10 is the easiest to repair):
- Many components are modular and straightforward to access—including the ports, fan, and speakers.
- Apart from the pesky pentalobe screws, this laptop opens about as easily as any.
- The battery is secured with a combination of screws and repair-friendly stretch-release adhesive—but you'll have to remove the logic board and speakers for access.
- The keyboard is integrated into the top case, requiring a full teardown for service.
- Soldered, non-serviceable, non-upgradeable storage and RAM is a serious bummer on a $1,200+ laptop.