By Adam O'Camb • Difficulty: Moderate
The Pixel 3a breaks all the rules—a polycarbonate back panel, no wireless charging, visible bezels, a headphone jack, and a top-notch camera in a budget phone. Is there a method to Google’s madness? A teardown might be the only way to find out!
Looking to get every groundbreaking teardown update? Check out our Facebook, Instagram, or Twitter. For teardowns delivered straight to your inbox, subscribe to our newsletter.


- This phone's raw specs aren't meant to impress, but there's quite a lot here for the price:
- 5.6" OLED display with FHD+ 2220 × 1080 resolution (441 ppi) and Dragontrail Glass
- Octa-core, 64-bit Qualcomm Snapdragon 670 processor (2.0 GHz + 1.7 GHz) with 4 GB LPDDR4x RAM
- 12.2 MP, ƒ/1.8, OIS main camera with dual-pixel phase detection autofocus; 8 MP selfie camera
- 64 GB built-in storage
- USB-C and a mysterious 3.5 mm "headphone jack"
- Android 9.0 Pie


- If you're in a hurry, here's a teardown TL;DR in X-ray form—courtesy of Creative Electron.
- Those of us without X-ray powers can only see this pristine, polycarbonate exterior.
- One thing has persevered through the Pixel's changing materials—the partial matte finish on the back.
- Meanwhile, this Pixel's party piece—a rear camera like the one in the rest of the Pixel 3 line—promises some serious firepower for a budget phone.
- Turning to the front of the phone, we note how this notch-less 3a has bezels similar to the standard Pixel 3, but has just one front-facing camera.


- The 3a looks very much like its older brother, the Pixel 3, but with fewer seams. Ours also came in a rather distinctive color, which Google dubs "Purple-ish," but which we dub "Thanos Edition."
- That seamless enclosure points to a screen-first entry on this phone—we're hoping this will mean easier screen replacements than what we saw on the Pixel 3.
- Google also managed to fit a headphone jack in here—which weirdly feels like a luxury feature on this budget phone.
- From the back, it's hard to tell the 3 and 3a apart. Supposedly that brittle glass cover makes for a more premium handset, but we can't see the difference from here.
- The iPhone XR and Galaxy S10e would also like to take your budget smartphone dollars—but at $700+, they're not trying that hard. The Pixel 3a packs a slower processor and plastic construction, among other changes, to bring the price down a ton.


- What, no iOpener? Although it would help, this phone was easy enough to open without heat—a rarity these days.
- A spongy, easily-separated adhesive secures the display—which is good for repairs. But it's probably a trade-off that also leaves this phone less than waterproof, so beware.
- The usual tiny side bezels leave this expensive OLED panel vulnerable to our opening pick. Expecting this, we safely slice alongside the display and free it from the phone.
- Just like old times, the display is connected to the motherboard by a single ribbon cable.
- Rumors pointed to a "gOLED" display made by LG, but this is unmistakably a Samsung panel.
- Also along for the ride is a Synaptics S3706 touchscreen controller.
- GigaDevice GD25LH40C 4 Mb Serial Flash Memory


- We came overprepared with our Pro Tech Toolkit and its 64 driver bits—we only need one to twirl away these Torx screws and remove the midframe, along with its embedded earpiece speaker.
- On our way to the battery, we fold aside a couple of golden flex cables for the Active Edge sensors. In Pixels past, these cables were routed under the battery, out of sight and easy to destroy with wayward prying. It's nice to see them out of harm's way here.
- Onward to battery extraction, where two adhesive strips stand in the way. We locate the pull tabs and they cooperate without much fuss. Success! The battery is out.
- This battery beats out the Pixel 3's 11.2 Wh battery with its own 11.55 Wh (3.85 V, 3000 mAh) powerhouse. That falls neatly between the iPhone XR and Samsung Galaxy S10e, at 11.16 Wh and 11.94 Wh, respectively.


- Next to come out is the motherboard, with some wiry antenna barnacles attached to its underside.
- Some find it alarming, but what better type of hands to pull out a couple tiny cameras?
- The 3a inherits the well-reviewed 12.2 MP rear camera from the Pixel 3. Instead of having two 8 MP selfie cameras, the 3a only has one, averaging the ƒ/1.8 and ƒ/2.2 aperatures to a middling ƒ/2.0.


- Let's peep at these pixels to figure out what the chips are.
- Qualcomm SDM670 Snapdragon 670 octa-core processor + Adreno 615 GPU
- Micron MT29VZZZAD8DQKSL-046 W.9K8 64 GB flash storage + 4 GB LPDDR4X DRAM
- Avago AFEM-9046, probably a front-end module
- Qorvo QM78035, probably a voltage controlled oscillator
- Qualcomm PM670A PMIC
- Skyworks SKY77365-11 Quad-Band GSM / GPRS / EDGE Power Amplifier Module


- Back side:
- Google H1C2M Titan M security chip
- STMicroelectronics ST33J2M0 ARM SecureCore microcontroller
- Qualcomm WCN3990 wireless combo SoC
- Qorvo QM78012 RF fusion module
- Qualcomm SDR660 RF transceiver
- NXP PN81B, probably an NFC controller w/ Secure Element
- Murata SWUA 370 90 and Qualcomm PM670 PMIC


- Bonus chips!
- Cirrus Logic CS35L36-CWZR audio amplifier
- Qualcomm PM3003A power management
- Texas Instruments TLV7113318DDSE 200 mA LDO regulator
- Texas Instruments TLV70728PDQN 200 mA LDO regulator
- Texas Instruments TLV70718PDQN 200 mA LDO regulator
- Texas Instruments TLV73318PDQN 300 mA LDO regulator
- Skyworks SKY13351-378LF GaAs SPDT switch


- After the motherboard, there isn't much left in the barrel. That's not a bad thing, especially when each part comes out easily and in one piece.
- First we fish out the fingerprint sensor, complete with its wavy
tailflex cable. - Next, these plastic rails—serving dual purposes as both cabling routers and brackets which press the squeeze sensors in place.
- Down at the bottom edge, we find a modular USB-C port! This is a welcome design for this high-wear component, especially since the 3a does not offer wireless charging.
- The headphone jack also makes a cool modular comeback.
- Down south we also spot the vibration motor—a small, round LRA (Linear Resonant Actuator) as found in just about every smartphone not made by Apple or Google. No fancy precision haptic motor for this Pixel.
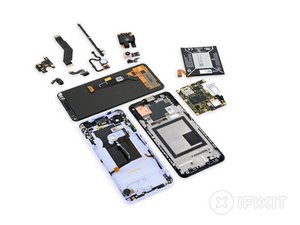
- After running the gauntlet of this teardown, we lay out our seemingly infinite number of
stonesparts. - While taking this phone apart was far from a "snap," we did enjoy some of the throwbacks to a prior, more-repairable era.
- How does this phone fare in the repair endgame? Check the score below to find out!

- The Pixel 3a earns a 6 out of 10 on our repairability scale (10 is the easiest to repair):
- Most components are modular and can be easily replaced once the display assembly is removed.
- Repair-friendly stretch-release adhesive secures the battery.
- The only screws are standard T3 Torx fasteners.
- The display comes off first, but is thin and poorly supported. Foam adhesive makes the opening process relatively easy.
- The myriad long, thin ribbon cables connecting the internal componentry can be obnoxious to work around, and are easy to accidentally tear.