By Tobias Isakeit • Difficulty: Moderate
After years of flirting with flagship prices, OnePlus gets back to their flagship-killer roots with the new OnePlus Nord—a mid-range device with a spec sheet that punches well above its price point. But how does it fare on the repairability scales, and what other secrets lay inside? OnePlus wouldn’t say, so we’ll let a teardown do the talking.
Can't get enough teardown? Here's where to get more: Subscribe to our newsletter or follow us on Facebook, Instagram, or Twitter for the latest teardown news.

- The primary spec that's meant to "wow" you is the €399 (£379) starting price (roughly $490ish equivalent in the USA, where it's not for sale, yet). But these other specs deserve a look as well:
- 6.44" Fluid AMOLED with 2400x1080 pixels and a 90 Hz refresh rate
- Qualcomm Snapdragon 765G with Adreno 620 GPU
- 8 GB of LPDDR4X RAM and 128 GB of storage
- 4,115 mAh worth of battery
- Four rear cameras and two front-facing cameras
- Under-display fingerprint sensor
- Are you ready for a teardown expedition? Let’s get goin’.
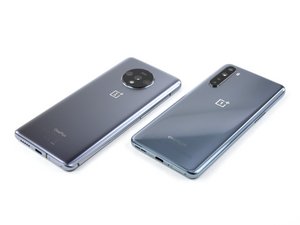

- To get your teardown's worth, you need a baseline for comparison. Consider last year's OnePlus 7T (left), which looks so superficially similar we're gonna have to make sure we remember to tear down the correct phone. What's different?
- First to stick out at you is that camera bump—not only is the underlying hardware different, but it's all migrated to a straight-line configuration on the Nord's left edge.
- The earpiece speaker grille also shrunk, and the Nord peers at you with dual hole-punch selfie cams, rather than a teardrop notch.
- The bottom edge looks similar (minus some antenna lines) and features a USB-C port, a redesigned speaker port, the SIM tray, and a
headphone jackmicrophone hole. - With the 7T safely set aside, this teardown officially gets underway.


- Good news—this opening procedure doesn't require heat! Our pick/suction handle combo performs with gusto, so we skip the bonfire for now.
- There are also no booby trap cables or hidden components—our journey is off to a good start.
- Wireless charging does have its benefits—namely, reducing wear on the charge port—but it's so dreadfully inefficient that we're having a hard time warming up to it, other than as a backup feature. Still, the iPhone SE (2020) did manage to pack in wireless, and at a lower price.


- We don’t need a map to guess that the battery connector hides behind this motherboard cover. (But for less experienced fixers, a map would sure be nice.)
- After removing eleven standard Phillips screws, the motherboard cover—with an NFC antenna and flash attached to it—comes off.
- This is one advantage that Android phones routinely flex over their Apple counterparts, which use a sometimes bewildering mix of proprietary and exotic screws in every size and length you can shake your fist at.
- Easy peasy removable battereezy—Like other OnePlus models before, the Nord comes with a handy pull tab for convenient battery removal.
- This can still stress the battery a fair bit, so for safety reasons you probably shouldn't re-use it after removal—only yank it out if you have a replacement ready.
- Labeled BLP785, this source of fresh energy provides the Nord with 15.92 Wh (4,115 mAh @ 3.87 V).
- Now our curiosity is all charged up. What else have you got, Nord?


- The rear cameras pop out in a gaggle:
- 48 MP ƒ/1.75 optically stabilized main camera using a Sony IMX586 sensor—reportedly the same as in the OnePlus 8
- 8 MP ƒ/2.25 ultra-wide camera with a 119° field of view
- 5 MP ƒ/2.4 depth camera
- 2 MP ƒ/2.4 macro camera
- The front cameras make their exit together:
- 32 MP ƒ/2.45 main camera using a Sony IMX616 sensor with only EIS (Electronic Image Stabilization).
- 8 MP ƒ/2.45 ultra-wide camera with a 105° field of view


- Although the OnePlus Nord carries no official IP rating, it does use rubber connector gaskets found in the IP68-certified OnePlus 8 Pro—so it may have inherited some water and dust resistance.
- Remove two Phillips screws and the motherboard lifts out next, revealing some thermal paste on the back.


- Finally some precious
stoneschips: - Skyworks SKY58094-11 Multimode Multiband Tx-Rx Front- End Module (FEM)
- Qualcomm PM7250 power management chip
- Qualcomm PM7150A power management chip
- Qualcomm PM7250B power management IC
- Qualcomm QET5100 Envelope Tracker


- But the real gems are on this side:
- Qualcomm SDM765 Snapdragon 765G
- Samsung MCP storage / memory combination chip, home to 128 GB of UFS 2.1 storage and 8 GB of LPDDR4X DRAM
- Snapdragon 865 5G Mobile Platform
- Qualcomm WCD9385 Aqstic audio codec
- Skyworks SKY5 3735-11 diversity receive module
- Qualcomm Atheros WCN3998 Wi-Fi 6-ready Chipset with Bluetooth 5, WPA3 Security, and Digital FM


- We head south, and with the bottom cover removed, we find a jungle of cables and rubber gaskets.
- All those components are individually replaceable: From the USB-C port through the interconnect cables, over to the vibration motor, finger print sensor, and its breakout cable.


- The display is quite a challenge to remove, glued tightly inside the plastic bezel. But with some heat and thin-tooled slicing, we eventually succeed.
- No more treasures under this lid—just a (somewhat oddly tilted) rectangular cutout for the fingerprint sensor. We assemble our belongings—leave no trace!—and head back to camp.

- This is the complete selection of treasures gathered during our journey.
- We have seen one rather accessible battery, lots of rubber gaskets, some interesting thermal solutions, and many replaceable components.
- OnePlus has definitely put itself back on the mid-range map. Let's wrap up and see where it landed on the repairability scale.

- The OnePlus Nord earns a 6 out of 10 on our repairability scale (10 is easiest to repair):
- You only need one Phillips driver for any repair.
- Almost all components are modular and can be individually replaced.
- The battery can be replaced once you removed the motherboard shield. It’s only lightly adhered and comes with a pull tab for easy removal.
- The primary access point for all repairs, the rear panel, is glued in place—but can be removed without heat.
- Display replacements, which are the most common repairs, are not prioritized.