By Dominik Schnabelrauch • Difficulty: Easy
Use this guide to replace a worn-out or dead battery in your Oral-B iO.
If your battery is swollen, take appropriate precautions. For your safety, discharge your battery below 25% before disassembling your toothbrush. This reduces the risk of a dangerous thermal event if the battery is accidentally damaged during the repair.
You’ll need the charging station of the Oral-B iO during the battery removal procedure.
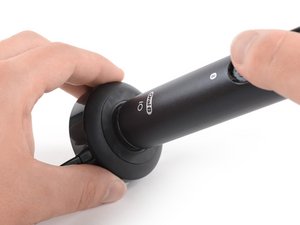

- Flip the charging station of your Oral-B iO upside down.
- Align the three recesses on the iO's silver bottom cap with the notches at the bottom of the charging station.
- Push the toothbrush into the charging station with mild pressure and turn it about 90° counter clockwise to unlock the thread of the bottom cap.
- Unscrew the bottom cap of your toothbrush.
- Remove the bottom cap.


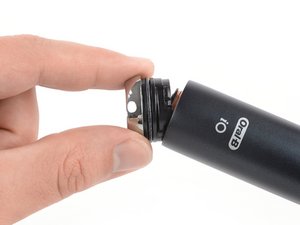
- Insert one arm of a pair of tweezers or a small flathead screwdriver underneath the bottom edge of the metal ring sitting above the grey rubber gasket.
- Use your tool to carefully pry up the metal ring.


- Use a pair of tweezers or your finger to remove the metal ring.


- Remove the brush head from your toothbrush.
- Hold the toothbrush body in one hand and use your thumb to press down the top of the toothbrush assembly.
- Pull the toothbrush assembly out of the opening at the bottom end of the toothbrush body.


- Pull the battery out of its recess on the bottom of the toothbrush assembly.
- Remove the battery.
If possible, turn on your toothbrush and test your repair before resealing.
Take your e-waste to an R2 or e-Stewards certified recycler.
Repair didn’t go as planned? Try some basic troubleshooting, or ask our Answers community for help.