By jwyoung • Difficulty: Moderate
Use this guide for removing and replacing the cooling fan in the PlayStation 2 (model SCPH-30001). Be sure to unplug your console and discharge static electricity before beginning. This guide will help you safely restore your PlayStation 2 to its working condition.


- Use the flat edge of a metal spudger to pry the eight flat screw covers out.
- Remove the following eight screws securing the top cover to the bottom case:
- Four 55.4 mm Philips screws
- Four 18.0 mm Phillips screws

- Some models have a different number of screws and feet. Remove all the feet and screws in the bottom of the case.
- The 10 screw model has 6 screws in the bottom-most portion and 4 in the upper tray.

- Peel the warranty sticker (located next to the main power switch) straight away from the case.
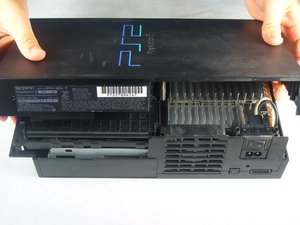

- Lift the top cover off the bottom case.
- Carefully remove the power cord that attaches the top and bottom halves by disconnecting the power cord assembly from the top case.
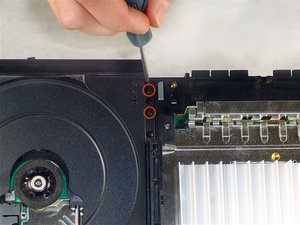

- Remove the two 6.4 mm black Phillips screws securing the optical disc drive to the bottom case.
- Lift and remove the optical disc drive straight up out of the bottom case.


- Remove the two 14.6 mm gold-headed Phillips securing the controller ports to the bottom case.


- Gently lift the controller port board out of its recess within the bottom case.
- Pull the controller port ribbon cable straight away from its socket on the controller port board.
- Remove the controller port board out of the bottom case.

- Remove the two 14.6 mm gold Phillips screws securing the fan to the bottom case.

- Pry and remove the expansion bay cover away from its posts on the bottom case.

- Lift the motherboard assembly from its front edge and remove it from the lower case.

- Remove the four 7.6 mm gold-head Phillips securing the power supply to the motherboard assembly.

- Lift the expansion bay cage up off the motherboard assembly.


- Pull the power board connector straight to lift it out of its socket on the power board.

- Remove the heat shield from the motherboard assembly.


- Remove the small white piece of tape (highlighted in red) that holds the fan cable connected to the fan.
- Pull the fan cable straight up from its socket on the motherboard.
- Remove the fan and power switch assembly by pulling it out the bottom case.

- Remove the fan from the power switch assembly.

- Remove the power switch from its recess within the fan/power switch holder.
You’ve successfully replaced the PlayStation 2 fan! Plug the console back in and power it on to ensure the fan is spinning normally. To reassemble your device, follow these instructions in reverse order.