By Sam Goldheart • Difficulty: Moderate
Spring has sprung and HTC has hatched a new One. Join us as we take a closer look at this season's newest sprout, the HTC One (M8). After all, it's our job to weed out the irreparable, and the best way to do that is through destruction—er, precise analysis.
Ready to spring into action? Follow us on Instagram, like us on Facebook, or listen to the birds tweet on Twitter.


- For its second act, the HTC One brings some impressive props. The lengthy list of hardware includes:
- Quad-core, 2.3 GHz Qualcomm Snapdragon 801 processor
- 2 GB RAM
- 5" 1080p display with dual front-facing speakers
- 4 MP (2 "ultrapixel") f/2.0 rear Duo Camera with dual flash; 5.0 megapixel front-facing camera
- 16 or 32 GB on-board storage; up to 128 GB additional storage via microSD
- LTE, Bluetooth 3.0, NFC, 802.11ac Wi-Fi, and IR blaster
- The immediate question is whether the M8 will prove more cooperative than its nigh-unrepairable predecessor, whose hardware secrets had to be pried from its mangled aluminum corpse.


- While we ponder our plan of attack, we pause to appreciate the One M8's appealing—albeit inscrutable—brushed metal design.
- Dual rear cameras, dual flash—despite being dubbed the One, this phone likes its Twos.
- Spinning the M8 around, we find the first of another pair—two card trays straddling the upper end of the phone (microSD and SIM).
- Maybe we can just call it the One-Two? No? Moving on...
- The extra rear camera captures depth information, enabling a host of trick features like ex post facto focus adjustments and background removal. We can hardly wait to dig our spudgers in and see how it comes apart.


- Looking for a point of entry, we surprise the One M8 with a spicy hot iOpener.
- With the underlying glue sufficiently softened, we strum away with a guitar pick until the first screw peeks through.
- Just like that, the One M8's first line of defense is down—with the power of the Pro Tech Screwdriver Set, these screws are deftly dispatched.
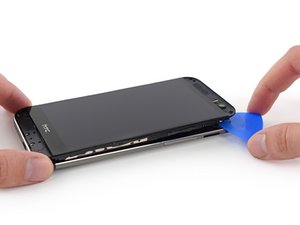


- We're on a roll. Gaining momentum, we free the M8's guts from its rear case with
the power of rock n' rollguitar picks.


- Here's where things turned ugly during our teardown of the first-gen HTC One (the phone that garnered the all-time worst repairability score of any smartphone we've ever had on the teardown table.)
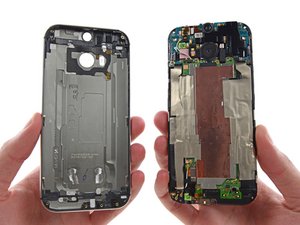
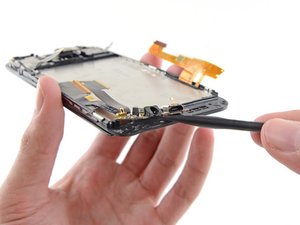
- To our delight, the pesky display cables of yesteryear have given way to spring contacts—so this time, the phone assembly comes out cleanly.
- No mangled aluminum here—the rear case remains intact. Apart from the NFC antenna and some nice machine work, there's not much to see.
- The rear case weighs in at 27.5 grams.
- The remaining assembly is a fair sight less tidy. A mass of copper shielding and tape awaits...


- Next, we spudge up the battery connector.
- We start working our way through what looks like aeons of tape strata. Digging through the entire Earth's supply of tape feels a little like a chest burster emerging from a ribcage.
- We're free! Well, except for the billion cables yet to be disconnected.

- If the rear case removal sparked our hopes for an improved repairability score, this glued-down motherboard is a bad sign.
- To improve is to change; to perfect is to change often. From a repairability standpoint, we'd like to see more change from this One.

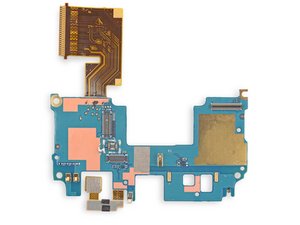
- The shields are down! Here's what we found lurking below:
- Elpida FA164A2PM 2 GB RAM + Qualcomm Snapdragon 801 quad-core 2.3 GHz CPU
- SanDisk SDIN8DE4 32 GB NAND flash memory
- STMicroelectronics 0100 AA 9058401 MYS
- Qualcomm PM8941 and PM8841 power management ICs
- Avago ACPM-7600 power amplifier module
- Synaptics S3528A touchscreen controller
- Qualcomm WTR1625L RF transceiver and WTR1625 (modem?)
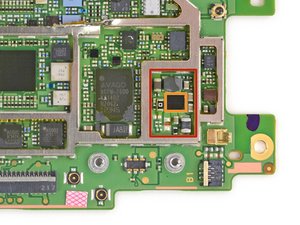
- A close up of the RF front end, highlighting the Qualcomm ET subsystem. That's "Envelope Tracking", not "ExtraTerrestrial".
- Inside the red line is the Qualcomm QFE1100 ET IC, plus all the associated passives, weighing in at around 50mm2 for the whole footprint.
- The QFE1100 ETIC itself


- With the motherboard free, we turn our attention to the battery.
- You heard right: you have to remove the motherboard to get to the battery, again, which is more than lightly adhered to the LCD shield.
- HTC touted the all-new One's exceptional battery management, with up to 2 weeks of standby from a 100% charge, and 15 hours on 5%. Wowsers.


- Time for a couple bite-sized goodies from the One:
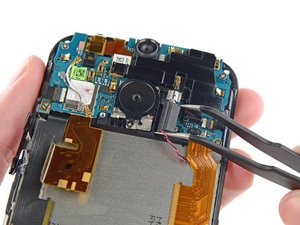
- The rotary vibrator motor lies in this square rubber case.
- The earpiece speaker is backed by a plastic amplifying chamber, providing the required oomph for this half of the highly touted "BoomSound" stereo speakers.
- With the speaker chamber removed, we're cleared for take-off to get this daughterboard off the
groundcase.


- Or at least we thought we were, until we found the glue holding the board in place.
- Our
willspudger is strong, but our spudgering arm is getting mighty tired. - With the daughterboard free, it's time to gather 'round for a peek at the fancy camera tech.


- Chipworks found last year's "UltraPixel" cam to be a 4-megapixel affair. This revision likely has the same pixel count, but with larger pixels.
- Much more interesting is the addition of this secondary rear camera, which in concert with the first enables all sorts of fancy image data manipulation, retroactive focusing, and special effects.
- Not to be outdone, the intrepid selfie-cam gets a huge spec bump, leaping from last season's 2.1 megapixels to a whopping 5.0 MP (more than selfiesufficient).


- A tap of our tweezers and we step into
speakeasyspeaker action. - Dr. Dre fans, beat your chests in sorrow: HTC's partnership with Beats Audio has ended. Despite this, early reviews confirm the speakers are quite good... for a phone.
- These HTC BoomSound speakers give some good vibrations, rated up to 95dB, or just shy of a pneumatic drill.

- Last to leave the party is the 3.5 mm audio jack, now sharing a small cable assembly with the microphone and micro-USB port on the bottom of the phone.
- We give it a gentle nudge out the door with the spudger. The end is in sight...


- With the front panel mostly stripped down, we finally get to display removal.
- Liberal heat around the edges of the glass and we're able to easily slide an opening pick around the perimeter, separating the adhesive.
- ...A little too easily, in fact, as we discovered the exact wrong place to slice and dice, severing the digitizer cable.


- With all of the quality control stamps and signatures on the back of the 1080p display, we're reminded of a certain Macintosh we recently tore down.
- To make a thin phone (9.4 mm), you need thin components. The fused LCD and digitizer measures little more than 2 mm.
- Down to a bare midframe, it's time for the teardown team to high-five, have a beer, and mull over the storm of a repairability score to come.
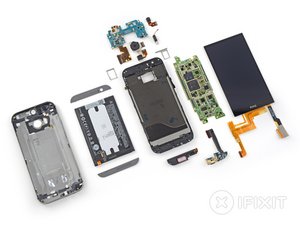

- HTC One M8 Repairability Score: 2 out of 10 (10 is easiest to repair)
- It's very difficult—although no longer impossible—to open the device without damaging the rear case. This makes every component extremely difficult to replace.
- The battery is buried beneath the motherboard and adhered to the midframe, hindering its replacement.
- The display assembly cannot be replaced without tunneling through the entire phone. This makes one of most common repairs, a damaged screen, very difficult to accomplish.
- Copious amounts of tape, adhesive, and copper shielding make many components difficult to remove and replace.
- Solid external construction improves durability.