By Jeff Suovanen • Difficulty: Easy
Modern electronics contain a dizzying array of internal data and power cable connectors—and nothing brings a project crashing to a halt like accidentally breaking a connector.
Use this guide to familiarize yourself with the most common types of connectors, and learn the tools and techniques you’ll need to disconnect (and reconnect) them safely.
- ZIF Connectors
- No-Fuss Ribbon Cable Connectors
- Locking Tab Connectors
- Other Ribbon Cable Connectors
- Flat-Topped (Low Profile) Connectors
- Press Connectors
- Coaxial Cable Connectors
- Display Cable Connectors
- Sliding Connectors
- Large Sliding Connectors
- JST Connectors
- Power Cable Connectors
- Bundled Cable Connectors
- Glued-Down Cables
- SATA Cables
- Soldered Connections
- Rare & Exotic Connectors (Part 1)
- Rare & Exotic Connectors (Part 2)


- To disconnect the cable, use a spudger, opening tool, or a clean fingernail to flip up the locking flap—this is the unlocked position.
- Once the flap is in the unlocked position, use tweezers or your fingers to gently pull the cable out of its socket.


- Simply pull these "no-fuss" ribbon cables straight out of their socket to disconnect them.


- Use a spudger to gently push up on alternating sides of the plastic tab until it clicks up into its unlocked position.
- Once the tab is unlocked, you can gently pull the cable straight out of its socket.


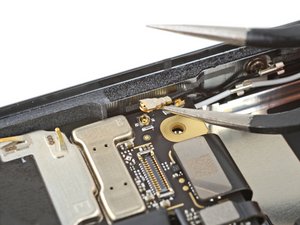
- To disconnect this connector, use a spudger or clean fingernail to lift the looped tab away from the connector.
- Then, use the tip of the spudger to push the plastic locking tab away from the socket—it should only move about 1–2 mm.
- You can now pull the cable straight out of its socket.
- Fully insert the cable into its socket under the locking tab.
- Loop the tab around the front of the connector.
- Use a spudger or clean fingernail to push in the locking tab, securing the cable.


- To disconnect the cable, use the flat end of a spudger to lift and unclip the outer edges of the connector. You may need to use your fingers to pull the connector completely out of its socket.


- Place a spudger or an opening tool under the connector's edge and pry straight up to disconnect it.
- Although more rare, some larger pop-style connectors might have a built-in pull-tab for easy disconnection. Lift straight up to disconnect these.


- To disconnect the cable, slide a thin, ESD-safe pry tool or angled tweezers under the metal neck of the connector (as close to the head as possible) and lift straight up from the board.


- Disconnecting these cables is a two-step process. First, gently push the tip of a spudger under the metal buckle to unclip it, then swing it over the socket.
- Next, hold the buckle and cable together and gently pull the connector straight out of its socket.
- Grip the cable and buckle together and insert the connector fully into its socket.
- Flip the buckle over the socket and use a spudger to press the buckle down until it clicks into place.


- To disconnect, use the point of a spudger to push on alternating sides of the connector to "walk" it out of its socket.


- Most of the time, these connectors will have a lip or a tab along the top that can be used to push the connector out of its socket.
- If there's no clear spot to use a tool, check out bundled cable connectors.
- To disconnect, use the wide end of a spudger to push on the connector tab to slide it out of its socket.


- To disconnect the cable, first try pushing on alternating sides of the connector, like small sliding connectors.
- If that doesn't work, use a pair of tweezers to firmly grip the sides of the connector and pull straight away from the socket. Hold the tweezers closer to the connector to get a better grip.
- If the connector's socket has cutouts, you can insert the arms of a pair of sharp tweezers into the cutouts and gently push the connector out of its socket.


- Squeeze the tab against the connector and pull straight up to disconnect it.


- Grip all the cables at once as close to the connector as possible and pull the connector slowly and steadily out of its socket.


- To remove it, carefully slide a spudger or opening pick under the cable to separate its adhesive.


- To remove them, pull in the direction of the cable.


- Not to worry! A soldering iron makes quick work of these little guys.


- Inspect the connector carefully, and try to determine how it disconnects.
- If you're still having trouble, look for guides of similar devices to see if they provide any clues, or ask for help in our Answers forum.


- Photo 1: A large metal cover latches over the full connector, locking it in place.
- Photo 2: A metal tab needs to be pushed in—instead of pulled out, to unlock the flat cable.
Still having trouble? Ask our Answers forum for help.
For more electronics skills, click here.