By Miroslav Djuric • Difficulty: Moderate
Use this guide to replace your Honda Accord's spark plugs. This specific guide was created for a non-VTEC F23A5 engine, but other 4-cylinder Honda engines will be similar enough to follow the same basic steps. You may have to remove the engine cover in later Accord models.
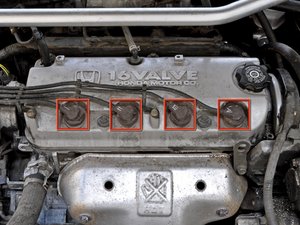
- Begin by locating the four spark plug connectors near the front of the valve cover of your engine.


- Grab the top of the spark plug connector and pull upward while rocking the connector around its socket.
- Once the connector has been disconnected from the top of the spark plug, lift it out of the engine.


- At this point, you can peer down into the spark plug hole and see the top of the spark plug.
- Attach a 5/8" spark plug socket to a 10" ratchet extension, and attach the extenstion to a socket wrench.
- Lower the spark plug socket down into the spark plug hole and press downward to firmly seat the spark plug in the rubber retainer found inside the socket. Make sure that the hex thread of the socket lines up with the hex thread of the spark plug.
- Rotate the socket wrench counter-clockwise to loosen the spark plug from the cylinder head.
- Lift the spark plug out of the cylinder head.
- Remove the old spark plug from the spark plug socket.


- Even if you are using pre-gapped spark plugs, it is a good idea to check the gap before installing your new plugs.
- Insert the thinnest portion of a spark plug gap gauge between the center electrode and the ground electrode of the spark plug.
- While holding the gauge between the spark plug gap, rotate it until it gently wedges itself into the gap.
- The distance of the spark plug gap can now be read off the gauge. The factory spec for this vehicle is anywhere from .039 to .043 inches.


- Insert a new spark plug into the spark plug socket until it is seated within the rubber retainer inside.
- Lightly coat the threads of the spark plug in anti-seize lubricant to aid in removal the next time the spark plugs are replaced.

- Carefully lower the new spark plug down into its hole, being sure not to contact the spark plug with the side of the tube leading to the cylinder head.
- Once the spark plug has reached the threads in the cylinder head, hand tighten the spark plug.

- Use a torque wrench to tighten the spark plug to a spec of 156 in-lbs (13 ft-lbs).

- Reinstall the spark plug connector and, if necessary, push the spark plug wire back into its plastic loom.
- Repeat this procedure for all four spark plugs.
To reassemble your device, follow these instructions in reverse order.