By Andrew Optimus Goldheart • Difficulty: Difficult
Use this guide to remove the glued-in battery from your MacBook Pro. This is best done with the help of an iFixit battery replacement kit; the liquid adhesive remover in your kit will dissolve the adhesive securing the battery, allowing you to remove it with ease. Alternatively, you can use an iOpener to apply a modest amount of heat in order to soften the adhesive before prying out the battery.
iFixit adhesive remover is highly flammable. Perform this procedure in a well-ventilated area. Do not smoke or work near an open flame during this procedure.
To minimize risk of damage, turn on your MacBook and allow the battery to fully discharge before starting this procedure. A charged lithium-ion battery can create a dangerous fire if accidentally punctured. If your battery is swollen, take extra precautions.
Note: The solvent used to dissolve the battery adhesive can damage certain plastics, such as the MacBook Pro's plastic speaker enclosures. Take care when applying the solvent.
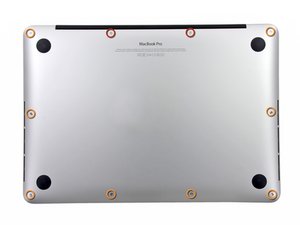
- Remove the following ten screws securing the lower case to the upper case:
- Two 2.3 mm P5 Pentalobe screws
- Eight 3.0 mm P5 Pentalobe screws

- Wedge your fingers between the upper case and the lower case.
- Gently pull the lower case away from the upper case to remove it.


- Use the flat end of a spudger to lift the battery connector straight up out of its socket on the logic board.


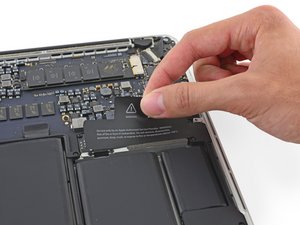
- Remove the two 2.1 mm T5 Torx screws securing the logic board end of the I/O board cable bracket.
- Remove the I/O board cable bracket.


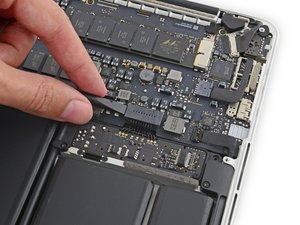
- Use the flat end of a spudger to pop the I/O board connector straight up off its socket on the logic board.


- Lift the logic board end of the I/O board cable straight up to bend it out of the way.


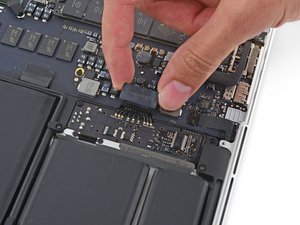
- Carefully tuck the tip of a spudger under the right speaker cable near the connector and lift it up out of its socket on the logic board.


- Carefully peel the right speaker cable off the upper case.

- Remove the following screws securing the right speaker to the upper case:
- One 5.7 mm T5 Torx screw
- One 6.5 mm T5 Torx screw
- One 3.8 mm T5 Torx screw


- Lift the right speaker from the cable end and pull it free from the case.


- Insert the tip of a spudger under the left speaker cable near the connector and lift it up out of its socket on the logic board.

- Remove the following screws securing the left speaker to the upper case:
- One 5.7 mm T5 Torx screw
- One 6.5 mm T5 Torx screw
- One 3.8 mm T5 Torx screw


- Lift the corner of the left speaker up and slide it out around the battery to remove it from the upper case.


- Use the flat end of a spudger to pop the trackpad connector straight up off its socket on the logic board.


- Lift the trackpad cable up off the battery to separate it from the adhesive securing it.


- Use the end of a spudger to flip the retaining tab on the ZIF connector.


- Pull the trackpad cable straight out of its ZIF socket on the trackpad control board.

- Remove the single 3.7 mm T5 Torx screw securing the battery board to the upper case.

- To protect your display, place a sheet of aluminum foil between the display and keyboard and leave it there while you work.


- Alternatively, if you are using the hot iOpener method, skip the following three steps.
- Wear eye protection when handling and applying the adhesive remover. (Eye protection is included in your kit.)
- Protective gloves are also included in your kit. If you are concerned about skin irritation, put your gloves on now.


- Pull off the black rubber stopper from your bottle of adhesive remover.
- Use scissors to cut off the sealed tip of the applicator.

- Apply a few drops of adhesive remover evenly under the edge of the rightmost battery cell.
- Wait 2-3 minutes for the liquid adhesive remover to penetrate underneath the battery cell before you proceed to the next step.


- Use the hot iOpener to cover half of the right-most battery cells.
- After about a minute, reheat the iOpener and move it to cover the other half of the right-most battery cells.


- Push a plastic card between the right-most battery cell and the upper case, cutting the adhesive between the two.
- When using the hot iOpener method, if you encounter significant resistance to prying, stop and use the iOpener to reheat the section you're working on.


- Repeat this procedure with the adjacent battery cell:
- Apply a small amount of liquid adhesive remover under the battery cell, and wait 2-3 minutes for it to penetrate and soften the adhesive.
- Alternatively, re-heat this section with your iOpener if needed.
- Push a plastic card about an inch between the battery cell and the upper case, and slowly pry the cell up to separate all of the adhesive.


- Temporarily leave your plastic card underneath the two rightmost battery cells to prevent them from re-adhering to the upper case.
- If using an iOpener, reheat it and reapply it, this time to the left-most battery cells.


- Repeat the above procedure to separate the two leftmost battery cells from the upper case.
- Remember to apply a small amount of adhesive remover to each battery cell, and wait 2-3 minutes for it to penetrate and soften the adhesive.
- Use a second plastic card to separate the two leftmost battery cells from the upper case.


- Insert the plastic card between the second left-most battery cell and the upper case to cut the adhesive joining the two, and pry the cell up from the case.


- Leave the second card in the corner between the two left cells.
- If using an iOpener, reheat it and apply it to the central battery cells.
- As before, leave the iOpener in each position for about a minute, reheating in between, to heat each half of the center cells.
- In the following steps, you can either use a third card, or the card from the right corner. The right corner adhesive should be dry/cool enough that the cells can easily be pulled up again when needed.


- If using liquid adhesive remover, apply a few more drops under each of the final two, middle cells.
- Allow 2-3 minutes for the adhesive remover to penetrate before you continue.
- Gently folding the right-most battery cells out of the way, insert a plastic card under the right center cell.
- Push the card in about half of its length to cut the adhesive holding the battery cell to the case.
- Leave the card in place to keep the adhesive from re-sealing.


- Repeat the same procedure for the last remaining battery cell.
- Holding the outer cells out of the way, insert the plastic card about halfway under the left center battery cell, avoiding the trackpad board.


- Return to the card beneath the right-center cell, and twist it to separate the entire battery from the upper case.
- If it does not come out easily, you may need to reheat the iOpener and apply it to the stuck areas, and then continue gently cutting the adhesive with the plastic cards.


- Remove the battery.
- With a little luck, you can slowly pull out each strip of adhesive with your fingers.
- Otherwise, soak each section of adhesive with a bit of adhesive remover for 2-3 minutes, and then scrape it out with an opening pick or one of the other tools in your kit. This can take quite a bit of work, so be patient.
- Mop up any remaining adhesive remover and give your MacBook Pro a few minutes to air dry.
- Calibrate your newly installed battery: charge it to 100%, and keep charging it for at least 2 more hours. Unplug and use it normally to drain the battery. When you see the low battery warning, save your work, and keep your laptop on until it goes to sleep due to low battery. Wait at least 5 hours, then charge your laptop uninterrupted to 100%.
- If you notice any unusual behavior or problems after installing your new battery, you may need to reset your MacBook Pro's SMC.
Compare your new replacement part to the original part—you may need to transfer remaining components or remove adhesive backings from the new part before installing. For instance, some replacement batteries may have little rubber nibs on the 4 corners of the central frame you'll need to gently snip off for the battery to sit properly.
To reassemble your device, follow the above steps in reverse order.
Take your e-waste to an R2 or e-Stewards certified recycler.
Repair didn’t go as planned? Try some basic troubleshooting, or search our Answers forum for help.