By Sam Goldheart • Difficulty: Moderate
Use this guide to upgrade or replace the solid-state drive in a MacBook Pro 15” Mid 2015. This MacBook Pro uses a proprietary storage drive connector, and is therefore not compatible with common M.2 drives without the use of an adapter.
Before you perform this repair, if at all possible, back up your existing SSD. Then, either familiarize yourself with internet recovery or create a bootable external drive so you’ll be ready to install macOS onto your new drive and migrate your data to the new SSD.
Finally, we strongly recommend installing macOS 10.14 Mojave (or a later macOS) before replacing the original SSD from your MacBook Pro. Most new SSDs require updated storage drivers not found in versions of macOS prior to macOS 10.14 Mojave.
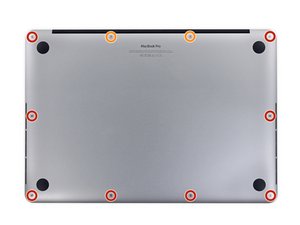
- Remove the following P5 pentalobe screws securing the lower case to the MacBook Pro:
- Eight 3.1 mm
- Two 2.3 mm


- Lifting from the edge nearest the clutch cover, lift the lower case off the MacBook Pro.


- Peel back the sticker covering the battery connector.
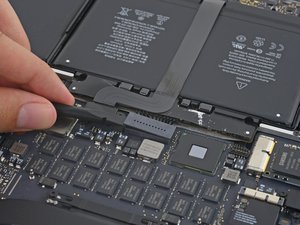


- Gently lift each side of the battery connector to pry the connector out of its socket on the logic board.
- Bend the connector back toward the battery, ensuring that the battery connector doesn't accidentally make contact with the logic board.
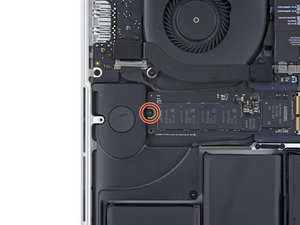
- Remove the single 2.9 mm T5 Torx screw securing the SSD to the logic board.


- Lift the end of the SSD up enough to pass over the speaker directly behind it.
- Pull the SSD straight out of its socket on the logic board.
To reassemble your device, follow these instructions in reverse order.